Organic.org |
| How to Correctly Plant Tomatoes to Get 5–8ft Plants Posted: 11 Nov 2015 11:53 AM PST  This is how we plant a tomato. First off, let's take a look at our sexy specimen here on the left. We started this beauty in our heated greenhouse in late January. We potted it up to a gallon container about 3 or 4 weeks ago. It will go into one of our freshly prepared beds, shown to the right.   We get them from the restaurant we grow for, Manresa. You might be able to get them free from a good butcher or fishmonger. I even know of someone who called a few restaurants in their area and was quickly rewarded with a nice bounty of juicy fish heads. Fish tails, spines, guts, as well as shrimp, crab, or lobster shells are all good as well. Some of you may worry about critters digging these up later. We've never had a problem with animals digging up my tomatoes, and we've got three dogs, two cats, and what seem like an endless supply of raccoons living on the property. I stress the point that this is the first thing that goes into our very deep planting hole. That may help keep it from getting dug up. You can see the six inch long fish head staring up at us from the bottom of the hole here. 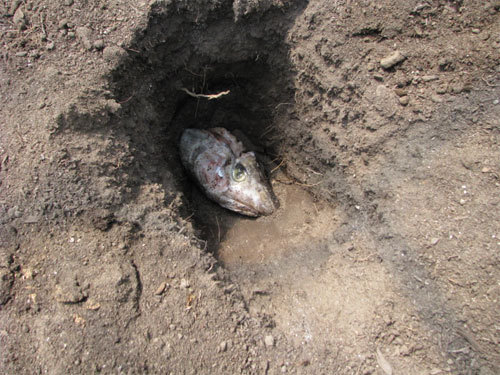 If you're reticent to put the fish head in the hole, or simply can't get your mitts on any, we recommend using fish meal as a substitute. Two handfuls is about right. We get ours from Gardner & Bloome.  The next thing that goes into the hole are a couple of aspirin tablets and some crushed chicken egg shells. The aspirin is to help jump start the plant's immune system. You can read more about that science here. We'll put three or four crushed egg shells into the hole as well. You can see our three colors of eggs from our fancy chickens – yes, those are green eggs in there. The eggs supply a nice calcium boost, which will help prevent blossom end rot, that nasty brown patch on the bottom of tomatoes that lack calcium (the fish head bones and bone meal also help with that). The next thing that goes into the hole are a couple of aspirin tablets and some crushed chicken egg shells. The aspirin is to help jump start the plant's immune system. You can read more about that science here. We'll put three or four crushed egg shells into the hole as well. You can see our three colors of eggs from our fancy chickens – yes, those are green eggs in there. The eggs supply a nice calcium boost, which will help prevent blossom end rot, that nasty brown patch on the bottom of tomatoes that lack calcium (the fish head bones and bone meal also help with that). We then put in two handfuls of Gardner & Bloome's Tomato, Vegetable and Herb Fertilizer. It's an all-purpose organic fertilizer that contains the essential macronutrients of nitrogen, phosphorus and potassiun. Their mix is a very nice 4-6-3 of those nutrients. We also recommend putting a handful of pure worm castings in the bottom of the hole. We amend our beds with worm castings and we also spray a worm casting tea on the plants while they grow. Really great stuff. Worm castings are available for sale at our tomato plant sale.  We put an inch or two of soil on top of the amendments in the hole. The plant is eased out of the pot, and before it's placed in the hole, I sprinkle a third of a cup or more on the rootball with a product called Xtreme Gardening's Mykos, which is a mycorrhizal fungi that attaches to the roots, growing as the root ball grows. It protects the plant from some diseases, such as verticillium and fusarium wilts. If there are any "silver bullets" here, it is this healthy addition of mycorrhizal fungi. Once the tomato is in the hole, we double check the depth by judging how far out of the ground the plant will be sticking.  If it's going to be too far down, we'll remove the plant and add some more soil. If it looks like it'll be up above the soil more than we want, that's too bad because we ain't gonna be fishing them fish parts and all that other stuff up out of that hole and digging it deeper. No siree. So we try our best to gauge the depth of the hole according to the height of the plant we're putting in. We then back fill GENTLY – only one quasi-firm push settles the soil around the plant.  Please do not man-handle the soil around the plant by stomping on it or pressing too hard. That's not necessary and it expels all the air out of the soil. Believe it or not, the roots need oxygen down there just as much as they need nutrients and water.  A temporary well is then made around the plant base to catch the first watering. The first watering is the most critical. We do it multiple times. Water it in once, twice, three times at least. Wait a few minutes to allow the water to drain through. If you have a deep hole, likely way more than 12 inches deep, you will be amazed at how much water it will take to wet the root ball a foot or more under the ground. So don't be stingy with the water the first day. Thereafter, you can back off the watering. Here's our finished bed. You can see the tomatoes are spaced pretty far apart:  If you're still not getting the results you want, then consider taking this Tomato Masters class. You can find more information all about tomatoes on the World Tomato Society website. Good luck, folks! [via RealFarmacy, Grow Better Veggies] |
| You are subscribed to email updates from Organic.org. To stop receiving these emails, you may unsubscribe now. | Email delivery powered by Google |
| Google Inc., 1600 Amphitheatre Parkway, Mountain View, CA 94043, United States | |
No comments:
Post a Comment